本文接續簡易 OLED Clock 網路時鐘的上篇內容,將說明電路如何連接與完整程式碼的撰寫。
上篇連接: ESP32 | Micropython | OLED Clock 網路時鐘(上)| 601
- rtc 模組: 211 RTC 實時時鐘 Real Time Clock
- urequest http 模組 :305 使用 ThingSpeak HTTP API 上傳 DHT11 資訊
- ssd1306 模組:208 I2C OLED 顯示文字
- timer 模組:
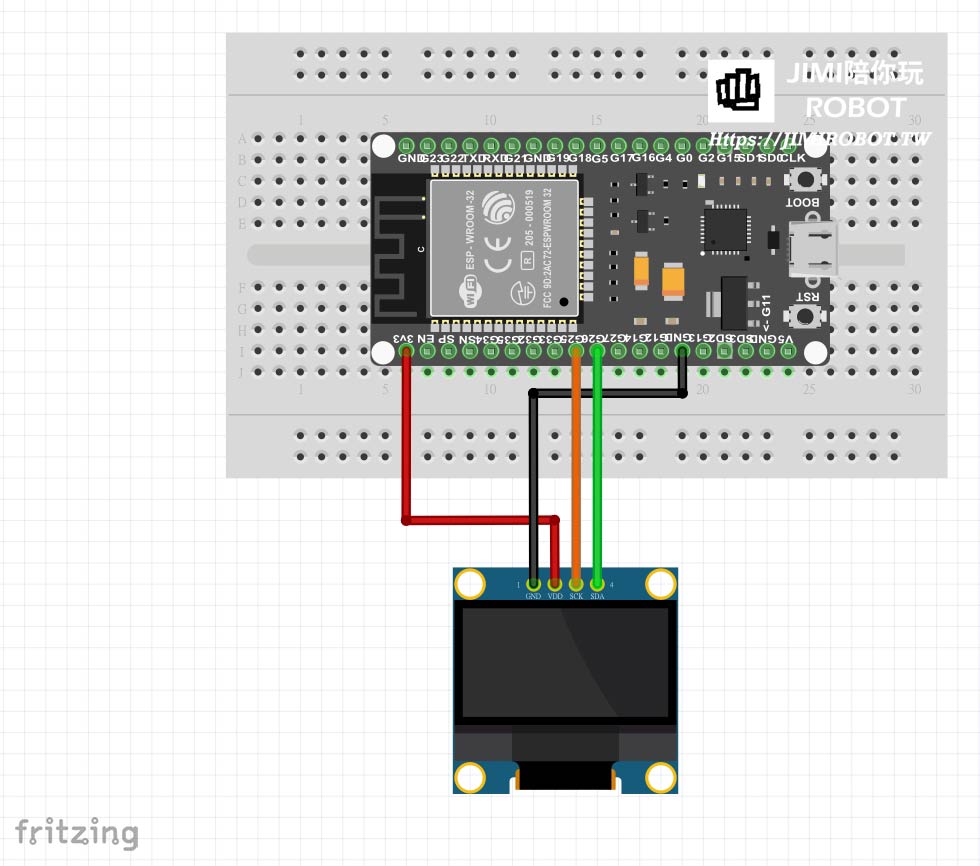
1. 電路連接
這個簡易的網路時鐘僅需要 ESP32S 與 0.96 吋的 I2C介面 OLED模組,當然如果各位朋友有其他尺寸的 OLED 也是可以,後續修改程式內 OLED 的解析度與文字擺放位置即可。I2C線路規劃使用預設的 ESP32 硬體 ID1 的腳位,SCL=GPIO25、SDA=GPIO26,並接上 3.3V 與 GND,完整接線圖如下:
2. 實作 OLED Clock
程式的主要架構依照前篇說明的流程撰寫,完整程式碼如下:
#website: https://jimirobot.tw by jimi
#import section and default setting
import machine,utime,time,network,urequests,ujson,ssd1306,gc
from machine import Timer
nyear=2000;nmonth=1;ndate=1;nhour=1;nmin=1;nsec=1; nweek=1;unumber=0;newT=0

# sub-program section
def go_wifi():
    try:
        wifi.active(False)
        wifi.active(True)
        wifi.connect('tp_station','09xxxxxxxx')		## wifi ssid and password
        print('start to connect wifi')
        for i in range(20):
            print('try to connect wifi in {}s'.format(i))
            utime.sleep(1)
            if wifi.isconnected():
                break
        if wifi.isconnected():
            print('WiFi connection OK!')
            print('Network Config=',wifi.ifconfig())
        else:
            print('WiFi connection Error')
    except Exception as e: print(e)

def get_net_time():
    clk_url='http://worldtimeapi.org/api/timezone/asia/taipei'
    global nyear,nmonth,ndate,nhour,nmin,nsec,nweek,newT
    try:
        gc.collect()
        clk_response= urequests.get(clk_url)	# get network time json
        if  clk_response.status_code == 200:
            json_data=ujson.loads(clk_response.text)['datetime']
            week_data=ujson.loads(clk_response.text)['day_of_week']
            nyear=int(json_data[0:4])			#get year
            nmonth =int(json_data[5:7])			#get month
            ndate=int(json_data[8:10])
            nhour=int(json_data[11:13])
            nmin=int(json_data[14:16])
            nsec=int(json_data[17:19])
            nweek=int(week_data)
            print("Time_Update Okay")
            newT=1
            clk_response.close()
        else :
            clk_response.close()
            newT=0
            print("update fail")
    except Exception as e:
        print(e)
        print('get net error !')
        newT=0
        go_wifi()

def update_oleddata(x):
    global newT,unumber
    if newT==1:					#if get net time from server sucessfully
        oyear=nyear
        omonth=nmonth
        odate=ndate
        ohour=nhour
        omin=nmin
        osec=nsec
        newT=0
        unumber+=1
    else :
        rdata=rtc.datetime()	#else get time from esp32 rtc
        oyear=rdata[0]
        omonth=rdata[1]
        odate=rdata[2]
        ohour=rdata[4]
        omin=rdata[5]
        osec=rdata[6]

    oled096.fill(0)
    oled096.text('~ TAIPEI ZONE ~',0,0)
    oled096.text('TIME {}:{}:{}'.format(ohour,omin,osec),0,16)
    oled096.text('TODAY {}-{}-{}'.format(oyear,omonth,odate),0,32)
    oled096.text('TIME CHECK {}'.format(unumber),0,48)
    oled096.show()

# initial section:  timer1, oled , rtc, establish wifi and get correct time
tim1=Timer(1)
tim1.deinit()
hw_i2c1 = machine.I2C(1, freq=200000)
oled096=ssd1306.SSD1306_I2C(128, 64, hw_i2c1)
oled096.fill(0)
oled096.text('~ INITIALING ~',0,0)
oled096.show()

wifi= network.WLAN(network.STA_IF)
go_wifi()
get_net_time()
newT=0
rtc = machine.RTC()
rtc.init((nyear,nmonth,ndate,nweek,nhour,nmin,nsec,0))
tim1.init(period=1000, mode=Timer.PERIODIC, callback=update_oleddata)

# main-loop section
while 1:
    utime.sleep(60)
    get_net_time()
>> 程式說明
整段程式可以大致分成4個區塊(import / def / initial / main-loop section),在說明順序上,會先跳過函式區塊,先瞭解主要流程,這樣應該會更容易瞭解。
#import section and default setting
import machine,utime,time,network,urequests,ujson,ssd1306,gc
from machine import Timer
nyear=2000;nmonth=1;ndate=1;nhour=1;nmin=1;nsec=1; nweek=1;unumber=0;newT=0
先匯入需要的模組,像是 machine、time、network、urequests 、Timer ,這邊會同時將程式需要的參數值建立,nyear ~ nsec 指的是來自網路的時間參數(分別對應西元/月份/日期等),在程式初始化階段如網路無法連線,時間參數將會用預設值填入;nmumber 為網路更新次數;newT 是網路時間更新成功的旗標,『newT=1』 為網路時間有更新值,反之則沒有,因網路有諸多因素會導致偶爾連線異常,因此設定此參數作為標記。
# initial section:  timer1, oled , rtc, establish wifi connection and get correct time
tim1=Timer(1)		# use timer1
tim1.deinit()		# close time1
hw_i2c1 = machine.I2C(1, freq=200000) 	#initial esp32 i2c
oled096=ssd1306.SSD1306_I2C(128, 64, hw_i2c1)	#initial oled module
oled096.fill(0)
oled096.text('~ INITIALING ~',0,0)
oled096.show()

wifi= network.WLAN(network.STA_IF)
go_wifi()
get_net_time()
newT=0
rtc = machine.RTC()
rtc.init((nyear,nmonth,ndate,nweek,nhour,nmin,nsec,0))
tim1.init(period=1000, mode=Timer.PERIODIC, callback=update_oleddata)
從程式第82行開始為初始化階段,將 timer 、i2c 建立起物件,分別採用 ESP32 內部的 timer1、硬體 i2c id1 ,其中 i2c 操作頻率為 200K,接著利用建立好的 i2c 物件,初始化 0.96 吋的 OLED,解析度為 128*64,在系統初始化時,畫面顯示” ~ INITIALING ~”。(如對於此上述基本設定較不熟的朋友,可以參考前言所列出的那些文章)
程式第 91 行建立wifi物件後,go_wifi() 此函式為開啟進行wifi連線,取得網路 IP,接著執行第 93 行 get_net_time()函式 ,連線 worldtimeapi 以取得第一次的網路時間參數(nyear-nsec 共7個,最後一個毫秒這邊直接忽略填0),之後放入 ESP32 rtc 的時間初始值。
當 ESP32 RTC 已開始正確運行後,此時可以啟動 timer1 的週期呼叫功能,此週期設定為 1000ms,也就是每一秒就會呼叫一次 update_oleddata() 函式,這個函式的作用就是更新 OLED 的時間畫面,讓我們在看 oled 畫面時可以看到類似時鐘的效果。(秒數會跟電子時鐘一樣更新)
# main-loop section
while 1:
    utime.sleep(60)
    get_net_time() 			#update the newest time
主程式 while 迴圈就做兩件事:『等待』—>『從網路更新時間』,utime.sleep() 目前是設定 60 秒,等待後再度執行 get_net_time() 連上 worldtimeapi 取得最新的時間。因這個專案主要是以內部 rtc 值做為我們時間參考依據,所以這邊的等待時間,如連線測試順利後,可自行將其參數改成小時以上,避免較無意義的 wifi 連線動作。
# sub-program section
def go_wifi():
    try:
        wifi.active(False)
        wifi.active(True)
        wifi.connect('tp_station','09xxxxxxxx')		## wifi ssid and password
        print('start to connect wifi')
        for i in range(20):
            print('try to connect wifi in {}s'.format(i))
            utime.sleep(1)
            if wifi.isconnected():
                break
        if wifi.isconnected():
            print('WiFi connection OK!')
            print('Network Config=',wifi.ifconfig())
        else:
            print('WiFi connection Error')
    except Exception as e: print(e)
最後就來講一下程式內定義的3個函式內容。
go_wifi() 的功用在於連線到指定的 ap 基地台,取得所需要的IP位址,在連線的過程中,利用 for 迴圈,設計一個簡單的20 秒 timeout 機制(程式第12行-第16行),一旦連線成功,print 出獲得的 ip,連線失敗則顯示網路異常。
def get_net_time():
    clk_url='http://worldtimeapi.org/api/timezone/asia/taipei'
    global nyear,nmonth,ndate,nhour,nmin,nsec,nweek,newT
    try:
        gc.collect()
        clk_response= urequests.get(clk_url)	# get network time json
        if  clk_response.status_code == 200:
            json_data=ujson.loads(clk_response.text)['datetime']
            week_data=ujson.loads(clk_response.text)['day_of_week']
            nyear=int(json_data[0:4])			#get year
            nmonth =int(json_data[5:7])			#get month
            ndate=int(json_data[8:10])
            nhour=int(json_data[11:13])
            nmin=int(json_data[14:16])
            nsec=int(json_data[17:19])
            nweek=int(week_data)
            print("Time_Update Okay")
            newT=1
            clk_response.close()
        else :
            clk_response.close()
            newT=0
            print("update fail")
    except Exception as e:
        print(e)
        print('get net error !')
        newT=0
        go_wifi()
get_net_time() 是我們連線 worldtimeapi 網站的重頭戲,關於怎麼取得對應地區的時間方法,在上篇的內容已說明,想得到台灣地區的時間, http request請求的連線網址設定成 http://worldtimeapi.org/api/timezone/asia/taipei。
如伺服器連線正常,也就是 http 的狀態碼為 200,將回傳的內容 clk_response.text 字串型態透過 ujson.loads() 方法轉成 dict ,並分別取出 KEY 為 datetime 與 day_of_week 的資料,datetime 內含當下時間值,day_of_week 則為星期幾的標示。
完整 datetime 的內容字串格式如下:2021-05-05T14:36:51.413220+08:00,所以西元年就是字串 index 的 0-3 位,月份就是5-6,以此類推;day_of_week 回傳的內容就是 0-6,星期天為 0,星期一為 1。因為取出的數值仍然為字串型態,記得用 int 的型別轉換成數字型態。順利完成時間參數更新後,將 newT 旗標設為1,並關閉 http 連線。
如果連線伺服器失敗的話(程式第45行),則是關閉 http 連線,並將 newT 指派0(系統 timer 每次呼叫 update_oleddat 函式時,該次就不會使用網路更新的數值)。如在連線中發生系統意外(最常出現-202),就再次啟動連線 wifi,等待下次更新時間程序。
def update_oleddata(x):
    global newT,unumber
    if newT==1:					#if get net time from server sucessfully
        oyear=nyear
        omonth=nmonth
        odate=ndate
        ohour=nhour
        omin=nmin
        osec=nsec
        newT=0
        unumber+=1
    else :
        rdata=rtc.datetime()	#else get time from esp32 rtc
        oyear=rdata[0]
        omonth=rdata[1]
        odate=rdata[2]
        ohour=rdata[4]
        omin=rdata[5]
        osec=rdata[6]

    oled096.fill(0)
    oled096.text('~ TAIPEI ZONE ~',0,0)
    oled096.text('TIME {}:{}:{}'.format(ohour,omin,osec),0,16)
    oled096.text('TODAY {}-{}-{}'.format(oyear,omonth,odate),0,32)
    oled096.text('TIME CHECK {}'.format(unumber),0,48)
    oled096.show()
此函式與 ESP32 的 timer 連動,timer 啟動時已設定 1秒週期性呼叫update_oleddata() ,因此 oled 的顯示資訊將會1秒更新一次,程式的邏輯主要為『如果連線 worldtimeapi 有順利更新時間時(newT=1)』,將最新的時間內容放到 oyear 等參數內;反之,在平常狀態或更新失敗( newT=0)時,則將 rtc 內部時間取出放入 oyear-osec 等參數。也就是這個專案架構下,一般平常時間的顯示都是利用 rtc 讀取來顯示,等到需要校正時,在連線網路來更新。
程式第 75-80 行,oled 會顯示目前的時間/日期,『TIME CHECK』 是參考用的數值,顯示目前已透過網路更新幾次。
>> OLED 執行畫面
整段程式碼如果順利執行的話,OLED 畫面如下:

3. 總結
這個網路時鐘的專案,簡單來說就只需要 oled 的顯示模組與 esp32s 這兩個硬體即可完成,各位朋友如果有需要的話,後續還可以再增加 DHT11 的溫濕度感測在程式內,有了時間+溫濕度感測這兩個數值,一個簡易的帶溫濕度計的網路時鐘就完成了,硬體 DIY 僅需 200-300 新台幣。
不過上述這段程式碼,JIMI哥自己幾天測試下,雖說可以穩定執行,還是有一些細節可以注意:
- 網路校正延遲問題: 雖然我們是透過 RTC 為主,網路時間為校正用,當透過 http 請求連線時間伺服器後,這個網路的封包傳遞了多久才回到我們 esp32 系統,此因素就會造成這個現象。更新後的時間比原本 rtc 的誤差大,也是有可能的。
- urequest 系統意外:使用 urequest 這個模組可以很方便送出 http 請求,但如遇到需要比較大記憶體的需求時(https 傳輸),偶爾還是會出現 OSErr 的情況,程式內部已透過 try- except 程序讓程式都可以穩定執行, 但此現象會成造成畫面突然當住1秒左右,接著畫面才持續更新,哥自己的推測應該是系統意外的優先權大於 timer 中斷向量,導致 micropython 會”暫時” 先處理一下此程序,接著再回到原本的 main-loop 迴圈。
單就 DIY 的小型專案而言,穩定的執行不當機,精度保持在可接收的範圍,就可以滿足基本需求啦,所以各位朋友如果還不滿足的話,可以再深思一下如何精進,今天的內容就到這邊,如果有遇到什麼問題或想法,歡迎在下面留言或寫信給我討論囉!